
Caching is one of the most effective ways to boost the efficiency of your website. Caching is available on almost all WordPress pages to store resources efficiently and speed up your website.
This Cache will need to be cleared from time to time. We’ll show you how to do just that, using several methods to clear the WordPress cache.
In this article, we’ll go through the basics of caching, how to clear the Cache in WordPress, and some of the most common caching plugins.
1) What is WordPress Caching?
Caching is the process of creating static versions of your content and serving them to visitors. Browsers render static pages quickly in most cases. As a result, your website will run more quickly. Rendering or fetching a page in WordPress generally requires back-and-forth queries to and from the database.
Caching is a process for storing copies of data or files in a temporary storage location (or cache) to be accessed more easily. It stores data in a temporary format for applications, servers, and web browsers, so users don’t have to download data every time they visit a website or use an application.
Multimedia such as images, files, and scripts are typical examples of cached data saved on a server the first time a user opens an app or visits a website. It is used to quickly load the application or website each time the user opens or visits a particular website.
These copies are stored in the WordPress or website cache until the cache expires, the content changes or the cache receives a purge command.
2) Why is it essential to purge the Cache?
Why would I want to clear the cache, you may ask? After all, the cache includes static copies of my webpages, making browsing more manageable and optimized. On the other hand, your website would be pretty dull if it doesn’t update with the passage of time or doesn’t have new content to show.
People would want to return to your website because of the new content.
As a consequence, an automated or manual cache purge is useful for presenting the updated data. After you clear the cache files in WordPress, the process begins again, with the cache taking static snapshots of what’s actually on your website.
Below are the lists when you need to clear the WordPress cache:
- Any changes made to a database.
- If you want to modify, erase, or add themes or plugins.
- Addition of new pages or articles.
- If you make improvements or modifications to previously published pages or articles.
- When it comes to making design improvements. If the website requires new branding or an A/B test shows that individual buttons aren’t converting, this is a regular occurrence.
- When you’re adding new items to your online shop, this is why you’ll need it.
The list of reasons to clear WordPress cache files are infinite, but the aim is to maintain a healthy balance between your cache and new content.
It’s a smart idea to serve cached pages to speed up your web. The cache’s periodic clearing, on the other hand, helps you to present new information while also restarting the caching process.
3) How to remove WordPress Cache using SSH?
To connect the web application, you must know the following:
- Server User OR Application User
- Server IP
- Port Number
- Application folder name
We will be using SSH protocol to connect the web application using a third-party client, i.e., PuTTY. For further guidance, please visit our knowledge base article on how to connect your application via SSH and SFTP.
Once you connect SSH using the credentials, Go to the application web root folder, i.e., public_html.
- Go to: cd /applications/application_folder_name/public_html
In the next step, go to the wp-content > cache folder by using the below command:
- cd wp-content/cache and hit enter
You will see cache files in that folder. So you need to remove them all by using the below command:
- rm –rf * and hit enter
4) How to flush WordPress Cache using WP-CLI?
To use the WP-CLI, you’ll need to install it on your WordPress site, but on Devrims Platform, you don’t have to do it manually because we have it pre-installed in all our servers which makes your life easier and ready to use WP-CLI.
Once you are into the webroot of your web application, i.e., public_html, run the below command:
- wp cache flush and hit enter
5) How to clear the cache using Redis Object Cache Plugin?
Before proceeding to the installation of the cache plugin, Devrims has a built-in Cache-as-a-Service feature enabled, which can be installed on 1-Click, i.e., Redis and Memcached.
- What is Redis?
- Redis is a storage and database system that operates exclusively in memory written in C and optimized for speed. It is open-source under the BSD license. Redis is an acronym for “REmote DIctionary S“
- Redis is mostly used as a cache to frequently access data in memory, enabling programs to respond quickly to users. Redis allows a collection of intelligent caching patterns by allowing you to decide how long you want to hold data and which data to revoke first.
- Most websites make use of Redis as a cache. Redis was also voted the most popular database technology by developers in the last four years of the study.
- What is Memcached?
- Memcached is a distributed memory object caching framework that makes dynamic Web applications run faster by reducing database load.
- To decrease the number of times an external database or API (application programming interface) must be accessed, the device caches data and objects in memory.
- Each object contains a key, an expiration period, optional flags, and raw data in the Memcached method. Until returning an object to the client, Memcached checks the expiration period to ensure that it is still relevant. By ensuring that the cache and database are modified simultaneously, the cache can be easily merged with the program.
You can choose any pre-configured caching services to install on a server level for improved performance while creating a server. If you wish to install the cache service later, kindly follow our knowledge base article on How to manage Software Services on Devrims.
Note: In this KB, we have already installed Redis on the server level and a Redis Object Cache plugin.
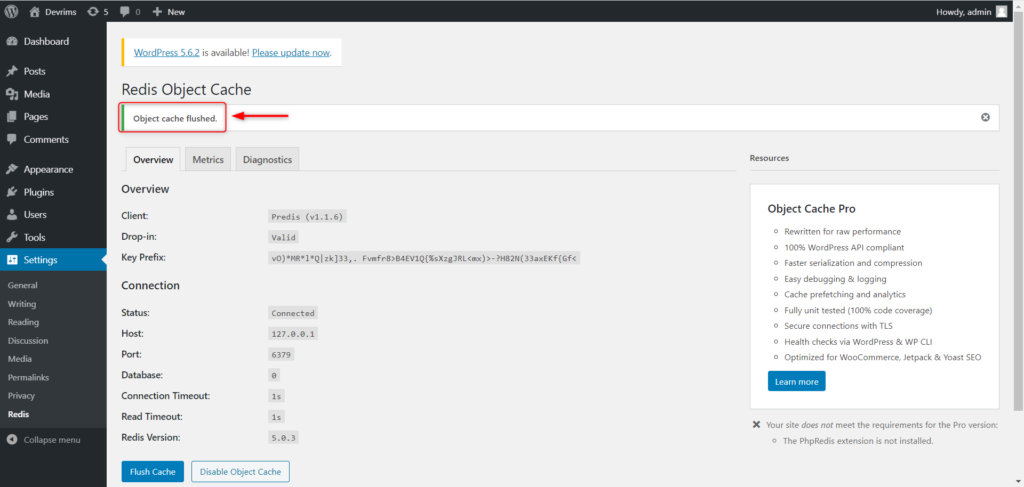
Let’s move on to the steps to clear the Redis Object cache. First, you need to login to your WordPress admin of your site using the admin credentials.
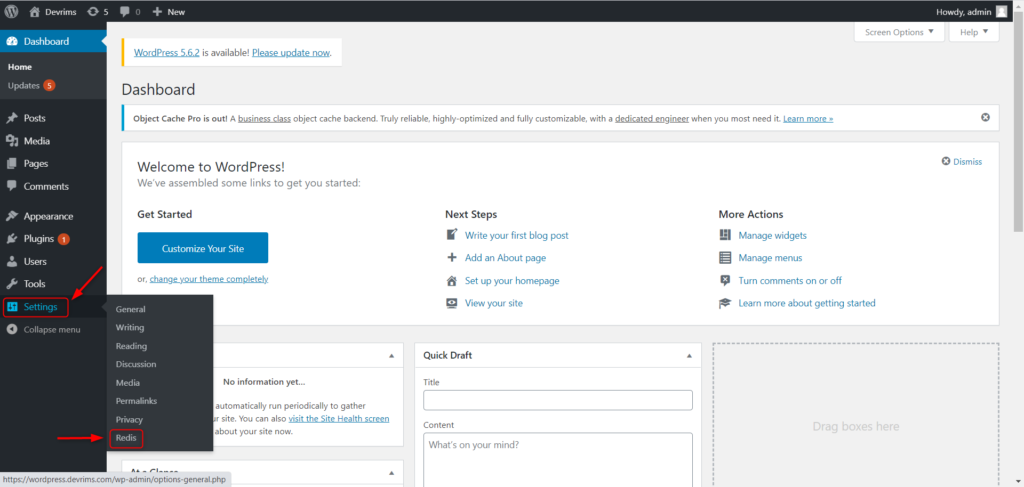
Hover your mouse on Settings and then click on Redis.
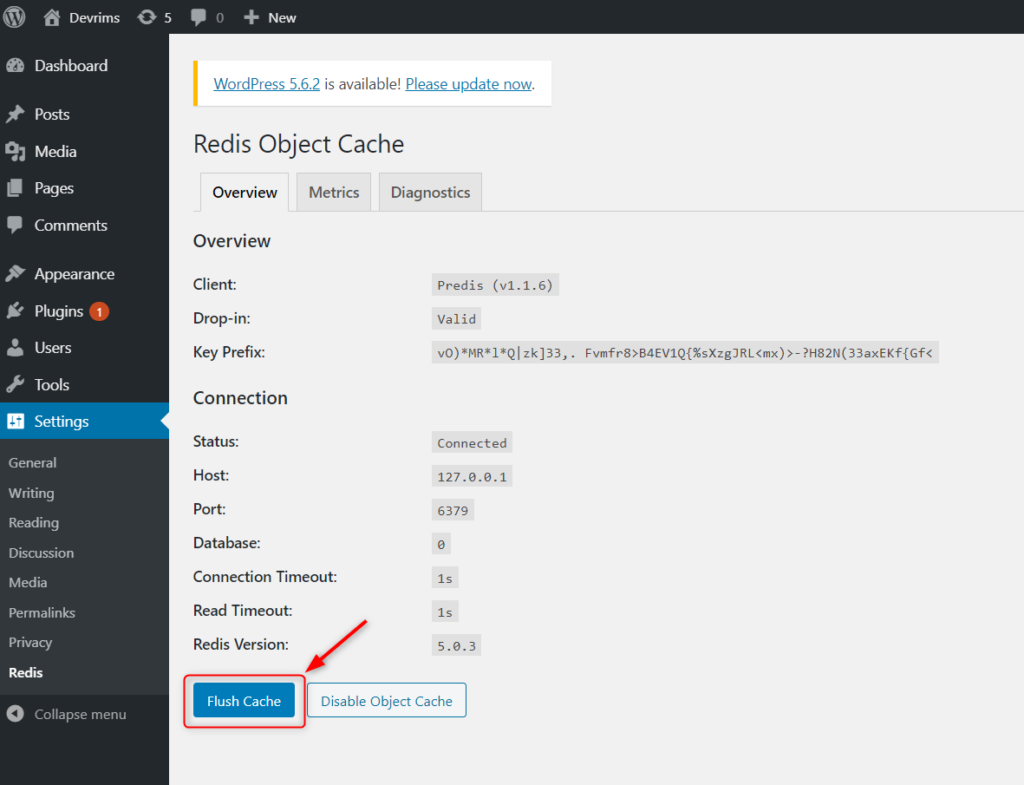
The below screen of Redis Object Cache will show.
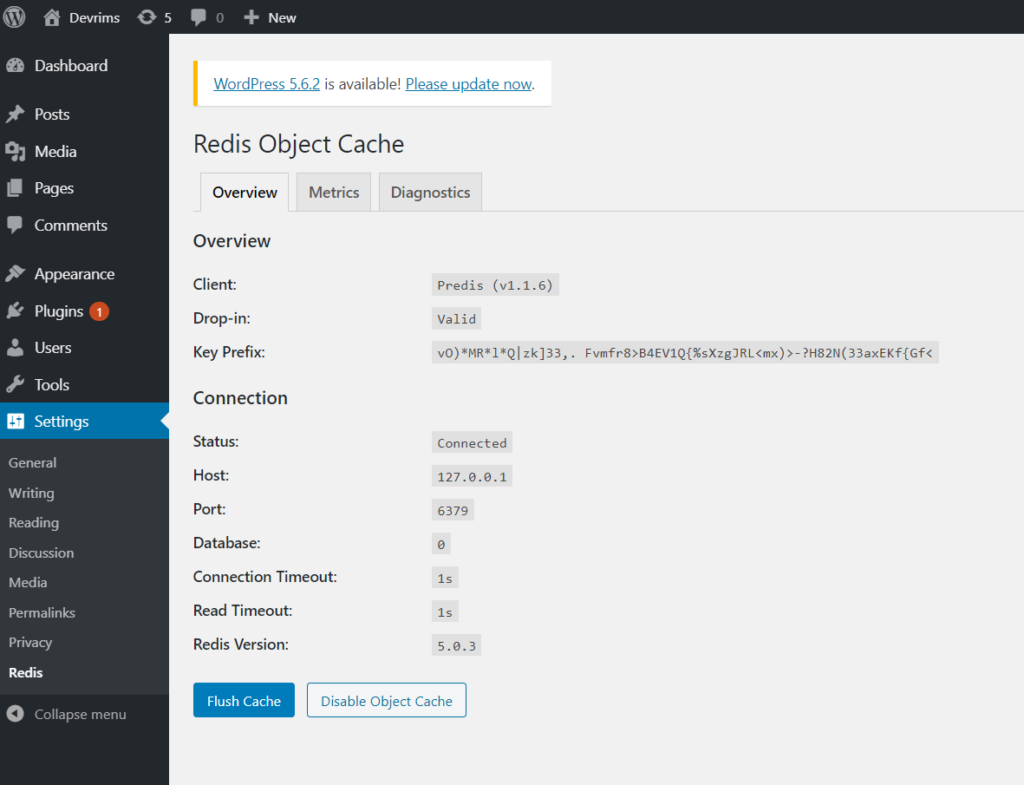
Just click on the Flush Cache button to clear & purge the cache.
A message on top will show:
6) How to clear Browser Cache?
When you add a plugin on your WordPress site or change content on a blog post, the plugin feature or new content can not appear when you visit your website’s frontend.
Most likely, you’ll need to either clear your cache on the server-side (as mentioned above) or clear the browser cache, which could be referencing a static page from before the update or new content submission.
Every browser, like Chrome and Firefox, has a feature for clearing the cache. The features are generally found in a Settings panel, but each browser has its own GUI, depending on which one you use.
As a result, we’ll walk you through the process of clearing the browser cache for the top four most popular browsers.
- Purge Cache from Chrome
Since Google doesn’t have a fast cache clearing icon, you’ll have to go to the Privacy and Security section to clear various web cache sections, such as the browser history and saved passwords.
Open your Google Chrome browser and click on the three-dot menu (⋮) button at the browser’s top right corner.
Click on Settings > Privacy and Security > Clear Browsing Data OR press ctrl+shift+del from your keyboard. A pop-up window would appear with options for you to choose from.
You can select the Basic tab, but it is recommended to click on the Advanced tab and select the options.
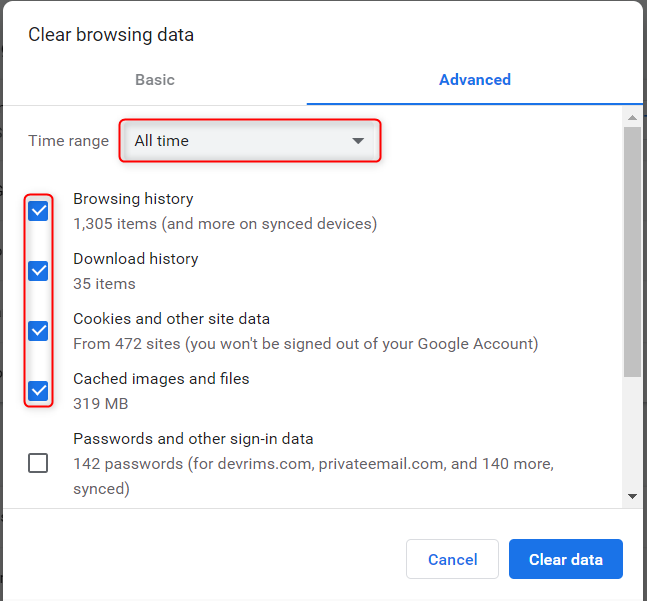
Make sure to select the Time range as All time and uncheck “Passwords and other sign-in data”; you will lose all your saved passwords if checked, and that could lead you to more frustration.
- Purge Cache from Firefox
Another famous internet browser, Mozilla Firefox, has similar tools for clearing the website cache. It provides a few extra options that make it easy to target the cache rather than browsing history or other items like cookies and passwords.
Click on the Hamburger (☰) button on the top right-hand corner of Mozilla Firefox and click Options.
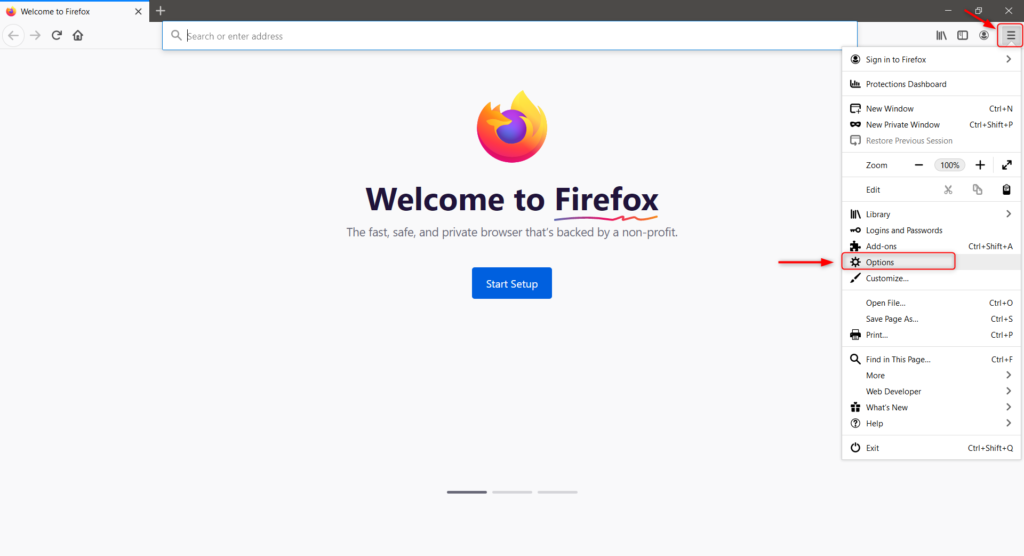
OR press ctrl+shift+del from your keyboard. A pop-up window would appear with options for you to choose from.
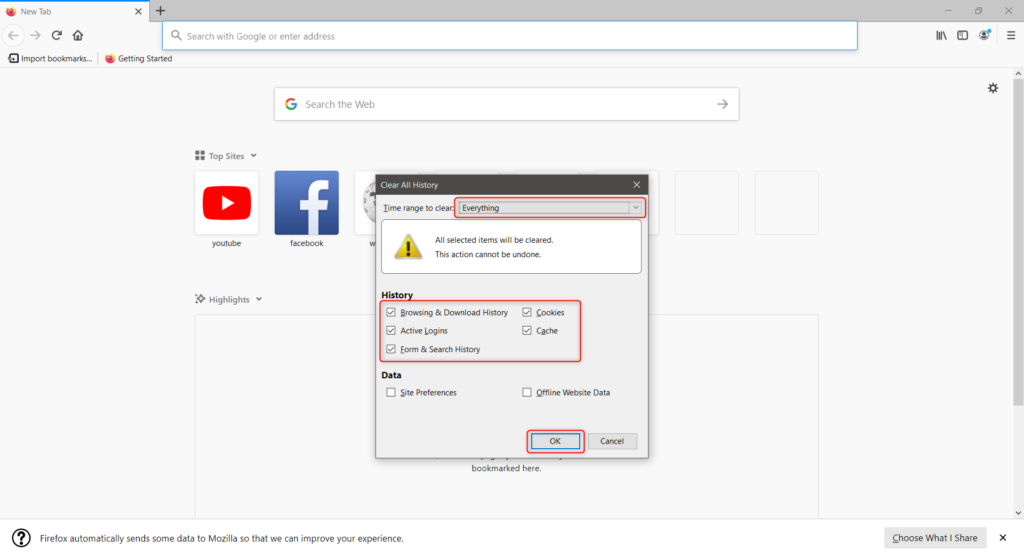
Make sure to select the Time range to clear as Everything and click OK.
- Purge Cache from Microsoft Edge
Clearing the web history and tab cache in Microsoft Edge is close to how it is done in Chrome.
Open your Microsoft Edge browser and click on the three-dot menu (⋮) button at the browser’s top right corner.
Click on Settings > Privacy and Security > Clear Browsing Data
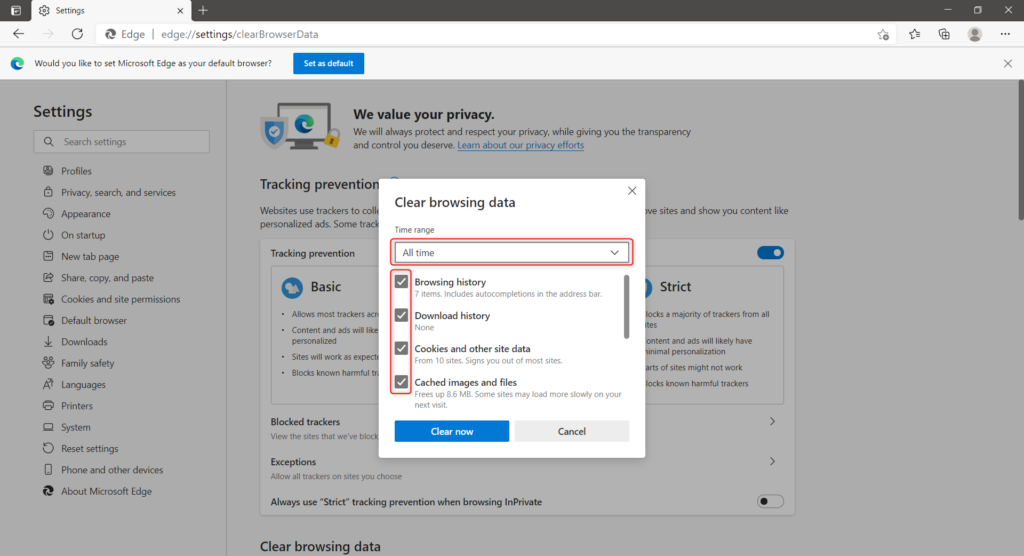
Make sure to select the Time range as All time and uncheck “Passwords and other sign-in data”; you will lose all your saved passwords if checked, and that could lead you to more frustration.
- Purge Cache from Safari
If you’re using macOS, you’re probably using the Safari browser. Clearing the browser cache is simple in this situation. Since Apple is known for its user-friendly navigation and GUI, open the Safari browser and navigate to the Settings icon on the top right corner and click on the History menu.
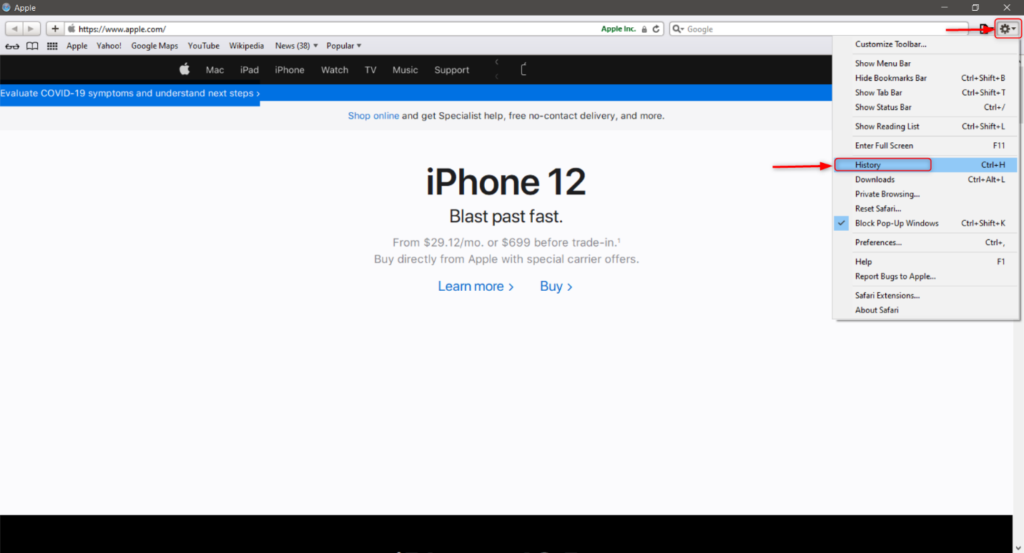
The only other step is to choose a period of time over which you want to clear.
Select the options from The Last Hour, Today, Today and Yesterday, or All History.
To complete the process, press the Clear History button after you’ve selected a timeframe.