
Changing a WordPress domain name is pretty easy. There might be a situation when you need to update your WordPress website URL manually and if you are not tech-savvy then it could really become a nightmare for you configuring everything by yourself.
There could be several reasons when you need to update the domain name manually such as:
- Moving from a subdirectory
- Adding or removing www
- Adding ‘HTTPS’ to the URL
- Moving to a new domain
There are different ways to update the WordPress domain name manually. In this KB, we will guide you through a step-by-step procedure to get this done in no time. You could choose any of the following steps:
1) Introduction to the WordPress Command Line Interface (WP-CLI)
Most of the developers want speedy, efficient, and quick tools to manage the website. The WP-CLI offers all of these and more while enabling you to manage your WordPress site remotely. Using the WP-CLI lets you do anything you can do in the WordPress admin — just much more quickly (once you’ve had a bit of practice). It gives you direct control over your site.
To use the WP-CLI, you’ll need to install it on your WordPress site but on Devrims Platform you don’t have to do it manually because we have it pre-installed in all our servers and you can access WP-CLI instantly.
Let’s start with the steps mentioned above to guide you through a step-by-step procedure.
2) Update the domain name via WP-CLI
In Devrims Platform, once you add your domain name in the Domain Management section of your application, your domain name is automatically updated in the WordPress database too. Just in case if you need to add it manually for the reasons mentioned above, follow the steps below:
a) Remote Connection via SSH
At first, you can use WP-CLI by connecting your server remotely via SSH.
You must connect your server via SSH or SFTP using Master User or Application User.
Note: You can see the instructions on how to connect your application via SSH and SFTP from our knowledge base article.
b) Navigate to the webroot
Now, you need to navigate in that specific directory where your wp-config.php file is located. Otherwise, WP-CLI will not be functional. We will be following the default path in this example that is in public_html directory. You can jump into the public_html folder by entering the command mentioned below:
Command: cd applications/application_folder_name/public_html/
c) Dry-Run
The –dry-run switch is one of the most helpful flags of WP search-replace. This flag swaps string with another one but does not save it in the database. Moreover, it demonstrates you a preview of the variations that can be made if run without a flag of –dry-run. User can apply this flag at the very end of the command.
Command:
wp search-replace –dry-run
For example:
wp search-replace oldomain.com newdomain.com –dry-run
d) Update Domain Name
After the –dry-run, you will see how many tables in the database will replace the URL.
The mentioned below command will help you to change the WordPress domain from http://olddomain.com to http://newdomain.com. It will replace one domain with another and save changes in the database. The command is the same as –dry-run but this time, simply remove –dry-run at the end of the command.
Command:
wp search-replace
For example:
wp search-replace oldomain.com newdomain.com
Once you have applied the changes in the database, you will get a success message.
3) Update the domain from WP-Admin
This method is the easiest way and the mos followed step. Simply log in to your WordPress admin area and go to the Settings » General page. From here you can change WordPress site URLs under the ‘WordPress Address’ and ‘Site Address’ options as mentioned in the below screenshot.
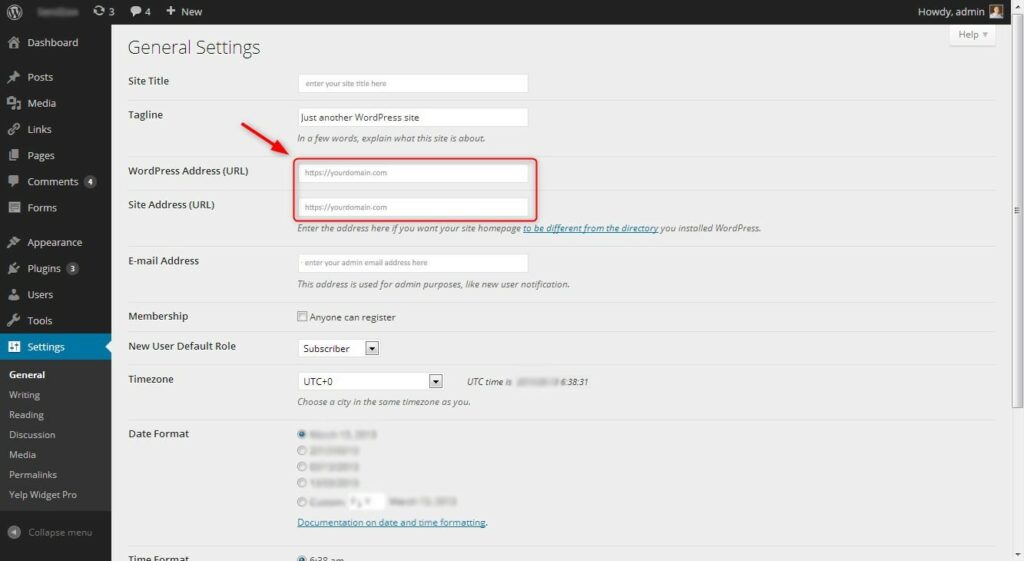
WordPress Address and Site Address are usually the same address.
Don’t forget to click on the ‘Save Changes’ button to store your settings. You can now visit your website to make sure that everything is working fine.
4) Update the domain name in the Database
Another way to update WordPress site URLs is by changing them directly in your WordPress database.
We suggest taking a WordPress database backup before making any changes. This step is really important and will help you undo database changes in case anything goes wrong.
There are multiple options to connect your database remotely using any Database Client. Kindly read our knowledge base article on how to connect the database using different MYSQL clients.
In this KB, we will give you an example of PhpMyAdmin. To install and connect phpMyAdmin, kindly visit our knowledge base article.
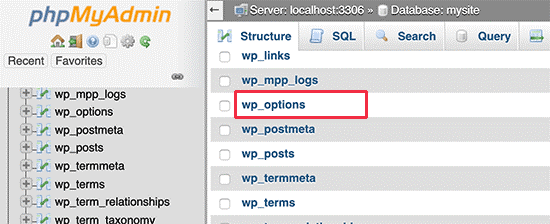
Once you launch phpMyAdmin, which provides a web-based interface to edit MySQL databases, go to your database name and click on wp_options table from the left column.
Next, you need to scroll down to the options table. phpMyAdmin will now display the rows inside the options table. You need to locate the rows where option_name is siteurl and home.
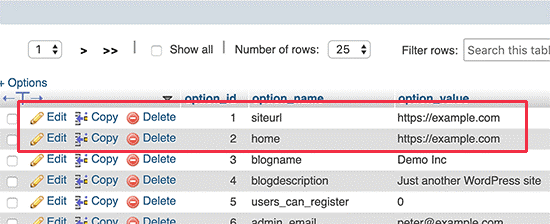
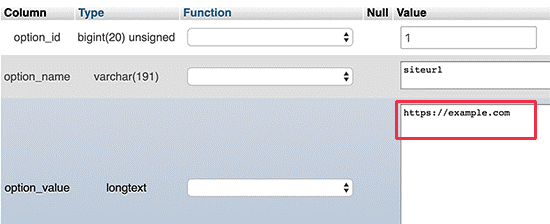
Next, click on the pencil icon on the left to edit each row and change the option_value field to the new site URL. After that, click on the tiny Go button at the bottom right corner to save your database changes.
You can now visit your website to see if everything is working fine.
IMPORTANT NOTE:
SET UP A PERMANENT REDIRECTION TO NOTIFY SEARCH ENGINES
If your site is SEO optimized then this step must be followed. Once your domain is successfully changed, you’ll have a lot of links throughout your content and across the web that point back to your previous address.
To do this, use SSH or SFTP to access the website on your server. For LAMP Stack running on Apache, go to the webroot of your web application and look for the .htaccess file. Before making any changes in .htaccess, we suggest taking the backup and then make the amendment.
Below is the following code:
#Options +FollowSymLinks
RewriteEngine on
RewriteRule ^(.*)$ http://www.example.COM/$1 [R=301,L]
Don’t forget to change http://www.example.com to your actual domain.